Using simple formatting in an e-mail
Using XperienCentral, you can send an automatic e-mail containing the information that a visitor submits in an interactive form. If you have already done this, then you already know that formatting an e-mail is a simple process. This article explains a small workaround that makes it possible to format an e-mail with a professional look and feel.
Prerequisites
Note: This article does not explain how to work with variables within an interactive form. This is fully explained in the XperienCentral online help (Application Tools > Interactive Forms > Scripting in Forms). This article requires that you have some knowledge of using variables in an Interactive From E-mail handler.
Requirements:
- An interactive form containing form elements that need to be filled in. In this article we use a Text field element, an E-mail form element, and a Radio Button form element in combination with a second Text field element.
- An E-mail handler that has been added to the interactive form. It can be in multiple languages or just in one language. The Page e-mail handler is used to send an HTML e-mail and that falls outside the scope of this article.
Desired Situation:
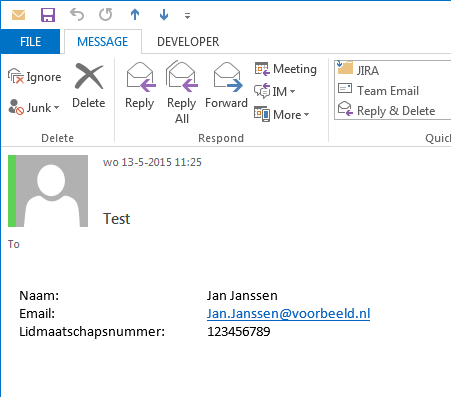
We want to format the mail so that the text that is filled in is inline with the titles of the form elements. For example:
|
Name: |
Jan Janssen |
|
Email: |
Jan.Janssen@example.nl |
|
Membership number: |
123456789 |
Solution:
In order to achieve the above formatting, we add a variable to the body of the e-mail handler between Javascript tags:
$
 var mail ="";
$
To this variable you can values in the normal way. For example:
$
 mail = mail + "Naam:" + step1.naam.value;
 mail = mail + "Email:" + step1.email.value;
 if (step1.bent_u_lid.value == 'ja'){
  mail = mail + 'Lidmaatschapsnummer:'+step1.lidmaatschapnummer.value;
 }
$
At this point, these values will be appended directly next to the titles of the form elements. In order to add some white space between the title and the value, you can add the Javascript variable for a tab (“\t”). The result is the following:
$
 var mail='';
 mail = mail + "Naam:\t\t\t\t" + step1.naam.value;
 mail = mail + "Email:\t\t\t\t" + step1.email.value;
 if (step1.bent_u_lid.value == 'ja'){
  mail = mail + 'Lidmaatschapsnummer:\t'+step1.lidmaatschapnummer.value;
 }
$
You may notice that the first two values have 4 tabs each while the third has only one. This is because “Membership_number” is longer and therefore its actual value doesn’t need to be pushed as far to the right. It might take a bit of trial and error in order to determine how many tabs to add and where in order to achieve the formatting you’re after.
You still need to make two adjustments before sending the email. At first, the new variables need to be placed at a new line. In Javascript you can do this by adding "/n". Also, in this piece of Javascript a value need to be returned for the all the information to show in the email. The full script looks similar like this:
$
 var mail='';
 mail = mail + "Naam:\t\t\t\t" + step1.naam.value;
 mail = mail + "\nEmail:\t\t\t\t" + step1.email.value;
 if (step1.bent_u_lid.value == 'ja'){
  mail = mail + '\nLidmaatschapsnummer:\t'+step1.lidmaatschapnummer.value;
 }
 mail;
$
When a visitor fills in and submits the form, they will receive an e-mail with the following formatting:

This is a way to create neat emails.

Comments
0 comments
Article is closed for comments.