Using interactive forms that send an e-mail, it is possible that you could receive Spam. For example, a bot can visit your website, find and fill in a form and then send it. This results in unnecessary e-mail messages and/or your backend systems (such as SalesForce) filling up with unwanted data. This article describes how to avoid this situation.
Concept
To prevent bots from sending e-mails, the so called “honeypot” trap can be used to detect and block the process. It does so by locking the bots out of specific form fields which your CMS can recognize as the work of a bot because the submitted form is missing vital information. This article describes how to set a trap with the help of hidden fields.
There are two types of honeypot: a “single” honeypot and a “double” honeypot. A “single” honeypot uses an empty, hidden input field which is checked to see whether it is empty. A “double” honeypot uses two hidden input fields, one of which must be filled in and the other must be empty. The first is checked to see whether it is empty, the second to see whether it contains a specific value.
The double honeypot is a very good method to use to quickly recognize bots. The faster your CMS can recognize a bot, the less mess you will have in your system.
Implementation
The only requirement for implementing a honeypot is the availability of the “hidden” presentation for a Text element:
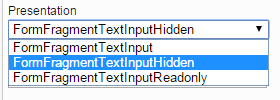
If this presentation is not available, contact GX Customer Services.
When this presentation is available, we can get started creating a honeypot. The steps required to set up a double honeypot are explained below. If you want to create a single honeypot, create just the first input field.
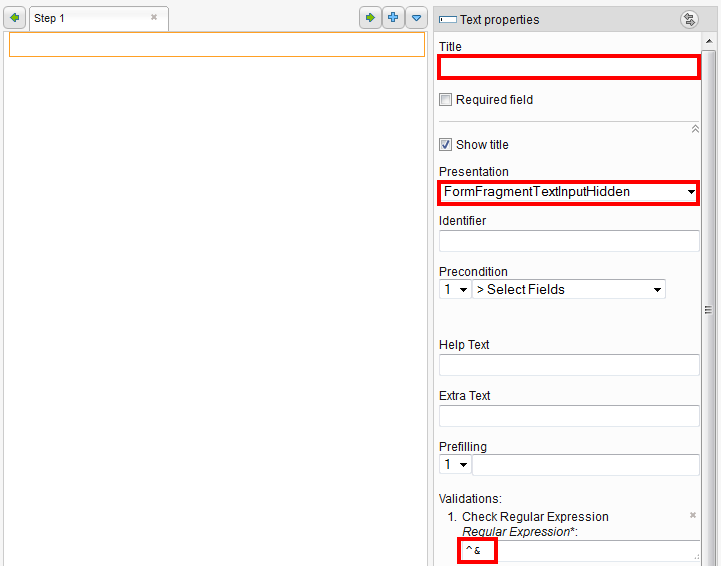
- Open an Interactive Form for which you want to create a honeypot. Add two Text elements. Tip: add them at the bottom of the form — this lessens the chance that an editor accidentally deletes one or both. The two fields will add a bit of whitespace to the form which is another reason to place them at the bottom.
- Delete the pre-filled titles of the fields.
- Select the “hidden” presentation for the fields.
- For the first Text element, select “Check Regular Expression” for the validation.
- Click [Apply]. The input field for the regular expression appears.
- Fill in the regular expression ^$. This expression simply checks whether the field contains anything between the beginning of the field (^) and the end of the field ($). For example:
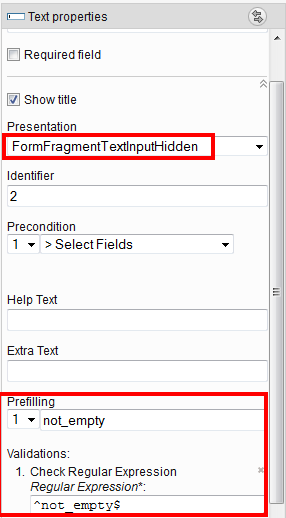
- For the second Text element, fill a string in the “Prefilling” field to identify it (“not_empty” for example).
- For the validation type, select “Check Regular Expression”. Click [Apply].
- Enter ^notempty$ in the “Regular Expression” field. The properties for the Text element should now appear as follows:
- Click [Apply]
Testing the form
To test whether the honeypot you created works, use the developer tools available in the most popular browsers (Chrome, Firefox, and Internet Explorer). In this example, will use Chrome. Follow these steps:
- Open the web page on which the interactive form was placed.
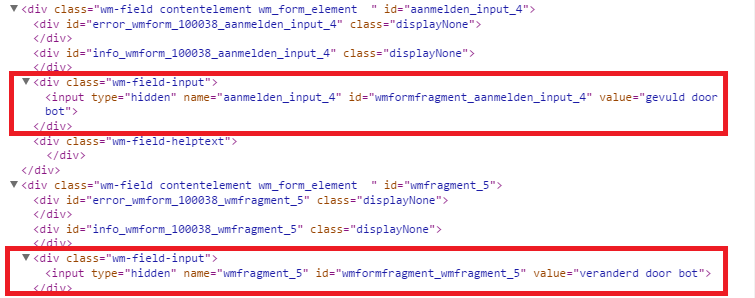
- Show the page source HTML and search for the hidden fields. For example:
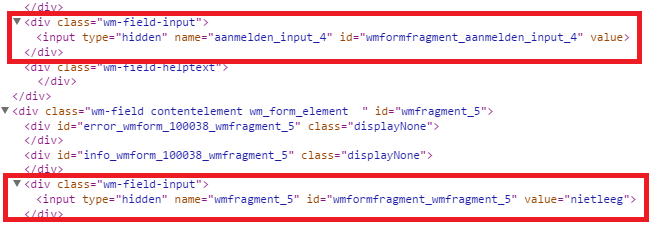
- Using the Chrome developer tools, fill in a value in the first hidden field (“filled in by a bot”, for example).
- For the second hidden field, delete or modify the existing value:
- Try to navigate to the next page in the form or try to send the values via an e-mail.
If the honeypot is configured correctly, you will see a message that your values are incorrect. A regular use will never see this notification, because he would never alter the values. A bot however, will not pass this form becauyse the system will recognize that specific fields have been altered. This change will make it impossible to send the form and because of that your backoffice systems will not be messed up.
Alternative
The above solution works in most cases. It can also prevent a browser from prefilling a form. A browser will sometimes prefill a form, for example your name address. It can sometimes happen that prefilled information prevents the form from being sent.
For this reason, there is an alternative method to solve the problem described above. In the alternative case, the fields are not checked when filled in but rather when the form is submitted.
Using the Alternative Method
Follow these steps:
- Add two Text elements to a form.
- Delete the titles of the Text elements.
- Select the “hidden” presentation.
- Prefill the second field with text (“not empty” for example).
- Click the title of the step and then click [Handlers and Routers].
- Add a condition.
- Select the first input field and leave the field beneath it blank (empty).
- In the “Then” field add a “Go to Step” router and select an error page.
- Add a second condition.
- Select the second input field and enter the “not empty” text that you created in the previous section.
- In the “Then” field add a “Go to Step” router and select an error page.
- Click [Apply and Close]. You should have something similar to the following:
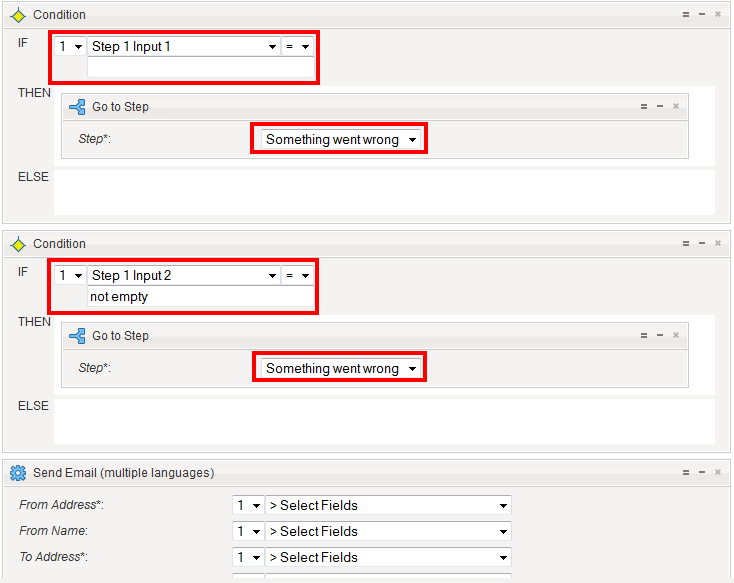
The test-procedure is similar to the previously described procedure.
Conclusion
Honeypots can prevent spam. The standard Interactive Forms functionality helps you to prevent or at any rate largely reduce the amount of unwanted spam you receive if a bot finds your forms.
Please note that using the honeypot method you will probably not be able to avoid all spam. Some bots are designed to get around this technique. Should you receive large amounts of spam, contact us and we will look into an alternative solution.
Good luck with building your own honeypot(s). If you have any other questions, don’t hesitate to contact us.

Comments
0 comments
Article is closed for comments.